Last Updated: Tuesday, June 9, 2020 at 3:03pm CST
You have just been told you need to develop an online course to teach in a few months. That’s great news, right? Well, maybe not for everyone. Developing an online course for the first time can be a daunting endeavor for the most seasoned of faculty members. There are countless factors that might terrify even the most tech-savvy of them all.
“There’s no way I can move what I do in my face-to-face class to online. It’s impossible.”
Those words have been uttered by countless faculty when being tasked with developing an online course for the first time. You might be thinking the very same thing. However, let us try and ease your worries, even by the tiniest amount. It can be done. We’re here to help you. Just as you guide your students into learning, we’re going to walk this journey with you to be successful at creating an online course.
This page is rather lengthy, so if you are looking for something specific, use the “Find” function of your browser by hitting ‘Control’ and ‘F’ for Windows Users or ‘Command’ and ‘F’ for Mac users; then type in your search word to locate quickly.

If you have only taught face-to-face classes, your first instinct may be to try and duplicate that course in the online environment. But just because it CAN be done, doesn’t necessarily mean that it SHOULD be done. Why? Online and face-to-face courses are different. Some things work better in the traditional classroom that don’t necessarily work online. For example, most traditional classrooms have a long lecture from the instructor that may take up the majority of the class time. All of the students are in their seats at the same time, listening to you speak. Now, think about the last time you had to do one of those mandatory trainings your institution makes you do every year. Someone reads the slides to you over your computer speakers, you click next. Rinse, repeat. See where we’re going?
To prepare yourself in making the transition from face-to-face to online, you need to understand that each type of course is different. Check out the following link to learn many of the different ways online courses are different from face-to-face. Remember, just because it’s different, doesn’t mean it’s wrong.

There will always be people who think online courses CAN’T be as good as face-to-face courses. To be perfectly candid, there are some really awful online courses being taught all over the world every single day. However, there are also traditional classes that can be lumped in that same category. If you have never designed, taught, or taken an online course, your opinion may be similar to the one above. Before we move any further, let’s break down some of the misperceptions of online courses. Watch this short video that discusses these misperceptions:
For more information on this topic, the Chronicle of Higher Education looks at more common misperceptions of online courses.

Before you take the plunge into starting to design your course, we want you to be aware of a few best practices that should inform your decisions on certain things you may be thinking about as you work through the process.
Universal Design for Learning
According to CAST (Center for Applied Special Technology), Universal Design for Learning, or UDL, is “a framework to improve and optimize teaching and learning for all people based on scientific insights into how humans learn.” UDL follows three different guidelines that look at the “Why,” the “What,” and the “How” of learning. By creating your course materials from a universal design perspective, you are able to effectively reach and engage all of your students. Watch the video below to learn more about how UDL works in the classroom.
To learn about more specific ways you might incorporate UDL principles in your classroom, check out the various examples through different disciplines at the following links:
- UDL Examples: Examples in Higher Education
- Universal Design in Higher Education: Promising Practices (Washington University)
Interaction and Engagement
Online courses can be rather lonely. A student sits behind their computer screen, reads information, takes an exam, and moves on. In a face-to-face classroom, it’s a lot easier to interact with students through various methods, but faculty seem to have more difficulty in the online environment. When creating an online course, you want to make sure your course has interaction and engagement, so it doesn’t become the dreaded “correspondence course.” Correspondence courses are not allowed for accreditation and legal purposes. Here is a great resource from SUNY that goes more in-depth on what is required to not be a correspondence course. There are three types of interaction you want to accomplish in your online course. They are:
- Instructor-to-Student (aka “Instructor Presence”)
- Content-to-Student (the easiest of the three)
- Student-to-Student (not simply group work)
When you start to think about how you will design your online course, think about how you will bring interaction and engagement in these three categories. For each of these types, here are some questions to ask yourself:
Instructor-to-Student
- Am I making myself available to my students through various forms of communication?
- Am I creating several spots where I give direct feedback to my students throughout the material and assessments?
- Am I describing my content to the students in a similar way as I would in my face-to-face classroom?
Content-to-Student
- Am I giving my students the resources they need to be successful in their assessments?
- Am I providing content in multiple forms (text, audio, video, etc.) to reach students with different learning styles?
- Is my content broken up into bite-sized (chunked) pieces that are more conducive to my online students?
Student-to-Student
- Are there opportunities for students to communicate with one another about what they are learning in the course?
- Are there learning activities and assessments used in the course that allows students to share their thoughts and ideas, creating a community of learning?
Also think about HOW you will be communicating with your students and HOW OFTEN. Students rely on communication from their instructors about due dates, changes to the course, grading, etc. Whether you use email and/or announcements in the course, remember to not overwhelm them with OVERLY communicating. Try to consolidate your out-of-course communications to no more than once-per-day.
For more information to help you with bringing interaction and engagement into your online course, check out the following resources:
Virtual Office Hours
Virtual Office Hours are a great way to enhance both your face-to-face and/or online classroom. However, studies have shown nearly two-thirds of students never attend an office hour with their instructor. You probably already have set days and times where you are physically available in your office for your students to drop by and discuss any question they may have about your class. But what about the students who are unavailable during those times or those who might stay away due to anxiety or another reason? Virtual Office Hours can help you reach all your students and reduce your time emailing answers to the same questions to every student.
Types of Virtual Office Hours and Their Benefits
Synchronous: A specific day and time where you are available to speak with your students using a web-conferencing tool (e.g., Blackboard Collaborate Ultra, Google Meet, Zoom, etc.) via chatroom, voice chat, and/or webcam.
The benefits of synchronous virtual office hours are:
- It builds a better personal rapport with your students.
- Multiple students can join at the same time.
- It can be done in the comfort of your own home.
Asynchronous: The use of a tool inside the Blackboard LMS, such as Discussion Boards, where students can ask questions at any time of the day that either you, the instructor, or other students can answer.
The benefits of asynchronous virtual office hours are:
- Every student can see what questions are being asked, so they are able to benefit together.
- Shy students can still participate in a more comfortable atmosphere.
- Office is open 24 hours a day, 7 days a week.
How to Make Your Virtual Office Hours Successful
If you can hold both in-person and virtual open office hours, you will give the best opportunity to connect with all of your students. However, just as you would with in-person office hours, there are a few things you need to remember to make the most out of your virtual hours as well.
- Be up front with your availability.
- Let your students know in the syllabus and in each weekly module what times you will be available. But do not overdo it! Make sure to set your boundaries. Your time is important, too!
- Determine how you will handle multiple students dropping in at the same time.
- Blackboard Collaborate Ultra and other video conferencing tools have “breakout” or “waiting” rooms that allow you to break off into a private room with one or more students. Become familiar with these tools in case multiple students drop in at the same time.
- Do not waste your time!
- A lot of faculty discover that their virtual open office hours simply become them sitting in front of their webcams waiting for a student to pop up on their screen. Your time is valuable. For a few extra points, ask your students to provide questions that you can answer in your virtual open office hours. You could then record your responses within the web conferencing tool and share the answers to your class afterwards. Even if no students are able to drop in during those times, they still get to ask a question and you still get the opportunity to help them.
Additional Resources:
- University of Washington – Virtual Office Hours
- McGraw Hill – 6 Ways to Move to Virtual Office Hours
- Making the Most of Virtual Office Hours
- Faculty Focus: Two Tips to Increase Students’ Use of Office Hours
Accessibility
When creating an online course, there will be some accessibility concerns that need to be addressed. You may have students that have visual and/or hearing impairments, so all course materials need to be accessible to those students. For example, scanned copies of textbook pages turned into a PDF cannot be read by a screen reader that visually impaired students depend on using.
We realize that this is a LOT of information and some might not be the easiest to understand. That’s okay. Reach out to a CETAL Instructional Designer if you would like us to walk through how to ensure your course is accessible to all students. If faculty have students that require specific accommodations, please contact the UCA Disability Resource Center (DRC) for more help.
When creating recorded lecture videos, faculty members should upload those files to either Kaltura or YouTube. This will allow the students to stream the video and not have to download the entire file, which helps students with slow internet connections. Those services will also create captions automatically. It is not a perfect solution, however. If the audio quality is good and you speak clearly and at a normal pace, its automatic captioning capabilities can make videos more accessible to your students.
REMINDER: If you upload videos to YouTube, make sure you make them “Unlisted” (instead of Public) to remain FERPA Compliant. Kaltura videos are already FERPA Compliant.
The DRC has compiled many tools and resources that can help you make sure every student can be successful in your online course.
- How to Design an Accessible Online Course
- 20 Tips for Teaching an Accessible Online Course
- 30 Web Accessibility Tips
- Tips On Moving Your Course Online
- TextHelp Read & Write Software Quick Reference Guide
- Read & Write for Mac and PC integrates with familiar applications (i.e. Microsoft Word, Apple Pages, Safari, and Adobe Reader) giving access to features for reading, writing, studying, and research support from within programs used everyday. Read & Write is an innovative toolbar for the UCA community that provides:

Alright, now we’re ready to start the planning and building process. Before we walk through the various steps of course design, we want to share with you a tool that will help you with organizing and planning your online course. We call this the “Course Planning Grid.” This document will act as your “blueprint” for the course. You can’t build a house without a blueprint, right? This document will help you create and visualize your learning objectives, learning activities and assessments, along with how you will bring interaction and engagement to your online course. This is where most of your time and effort will be spent. Like most things in life, the hardest part is the beginning. Download the Course Planning Grid Excel Spreadsheet at the link below and save it somewhere on your computer that you can easily find.

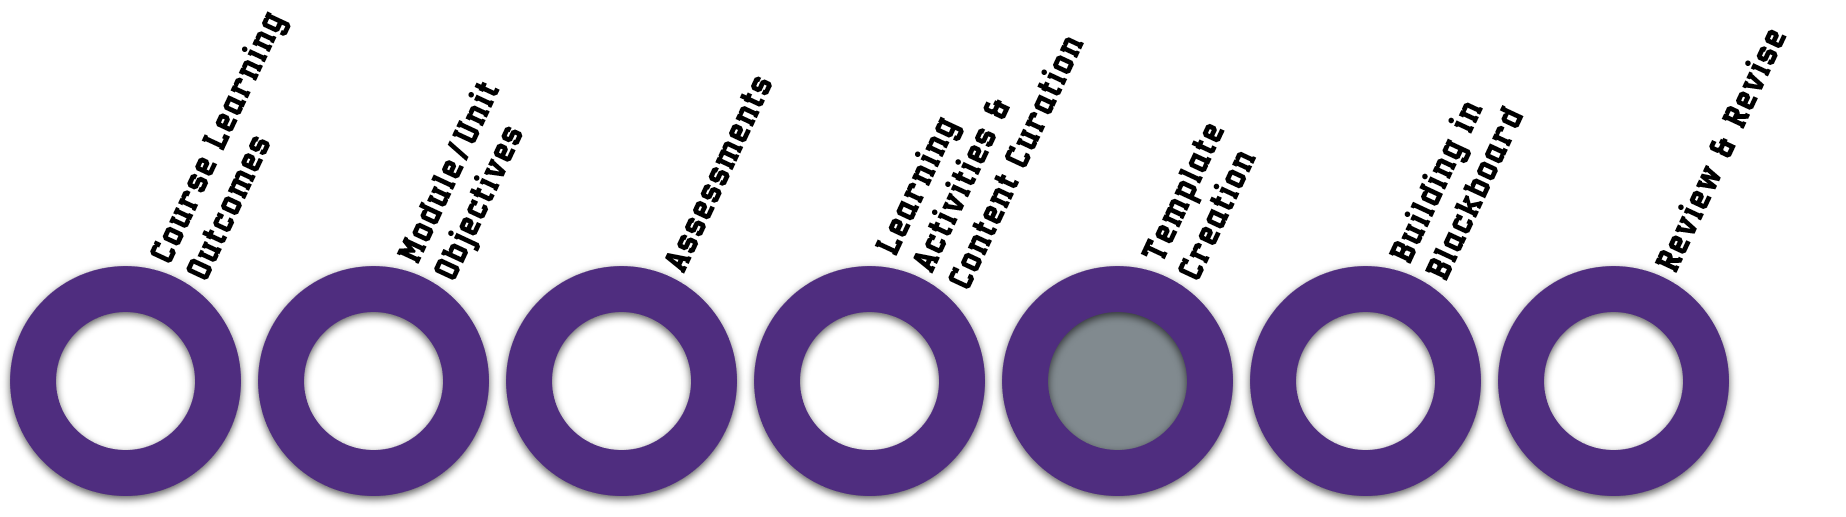
There are multiple ways to design an online course. There are pros and cons to each. In CETAL, we choose the backwards design process to help design courses with faculty. It allows for the course learning objectives to be aligned to the assessments, removing arbitrary material that may not help students achieve the outcomes of the course. It’s a way to plan a roadmap for your course. You create a “destination” for your course, and backwards design allows you to plan how to reach it.
This process takes a linear approach. However, this is not always possible with course design. Most faculty are probably comfortable with starting at Step 4. This will happen because most course design is an iterative process that has to be done in an order that makes sense to the faculty developer. From an instructional design approach, we feel the backwards design process makes the most sense when starting from a clean slate. If you do not have that luxury, use the steps below to determine the method that works best for you.
Watch this short video to learn more about this process:
Alright, now let’s get started!

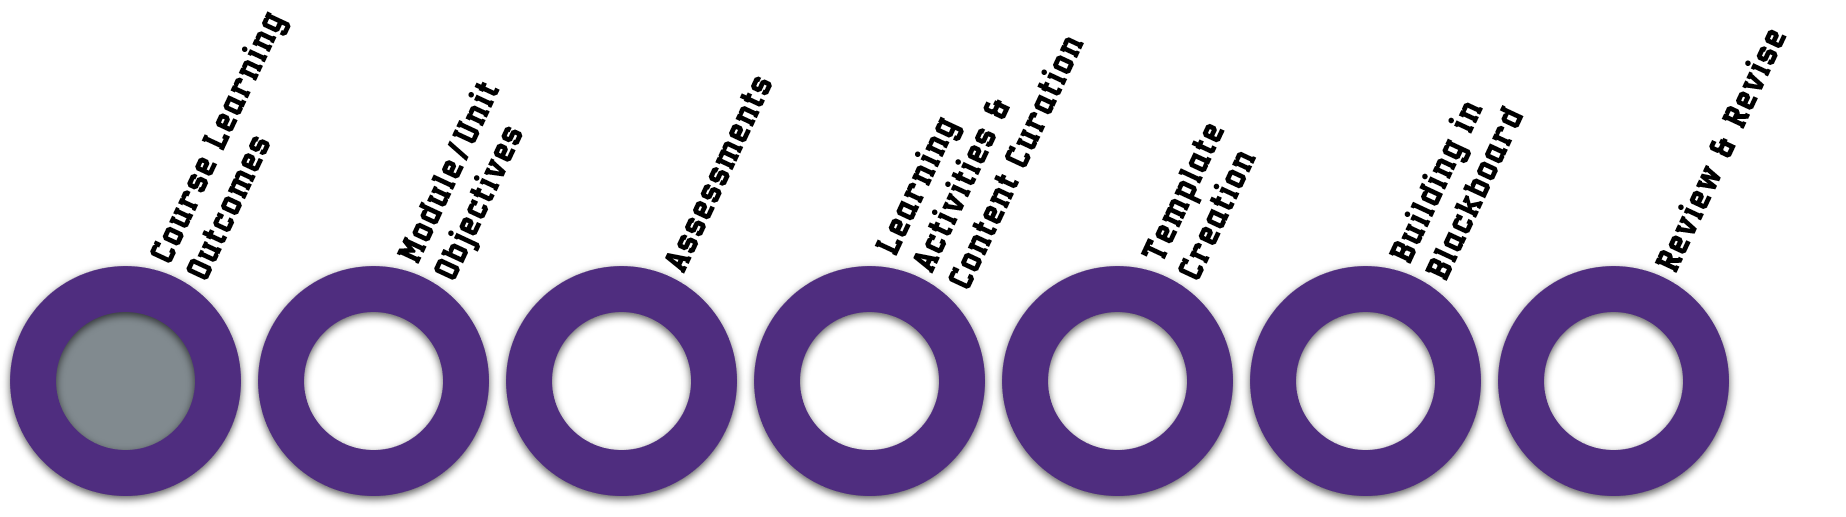

Step 1. What should my students know and/or be able to do once they successfully complete this course?
That is the first question you should ask yourself when getting started designing your course. Your outcomes should be measurable. If one of your outcomes is for your students to “understand the material,” that is not measurable. How can you know they understand the material? Bloom’s Taxonomy is a great method to help you with writing your objectives. Typically, lower-level courses will start with the bottom of the pyramid, while upper-level/graduate courses will focus on the top of the Bloom’s pyramid.

For more information on writing Course Learning Outcomes and Bloom’s Taxonomy, check out the following resources:
- Tips on Writing Course Goals/Learning Outcomes and Measurable Learning Objectives
- Using Bloom’s Taxonomy to Write Effective Learning Objectives

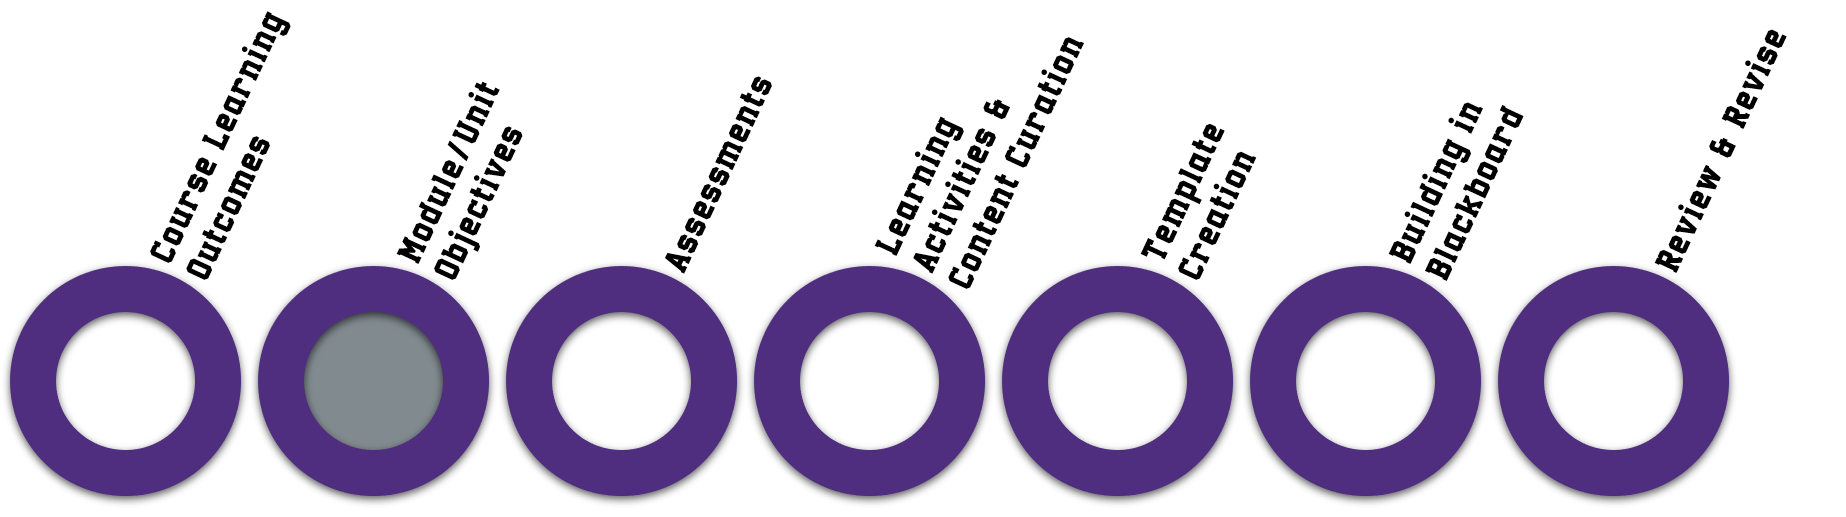

Step 2. What should my students know and/or be able to do after successfully completing this module/unit that aligns with my course learning outcomes?
In step 1, we looked at the big picture. Now, with step 2, you’re getting a little more granular in your approach. This is where you are breaking it down into smaller “chunks.” These modules/units could be broken up into weeks (Week 1, Week 2, Week 3, etc.), subjects (World War I, World War II, Korean War, etc.), or chapters from your book (Chapter 1, Chapter 2-4, Chapter 5, etc.). You will be using Bloom’s Taxonomy in Step 2 just like you did in Step 1.
For each of those modules, write measurable learning objectives that align with your course learning objectives.
If you would like more information about writing measurable learning objectives, check out the following resource:

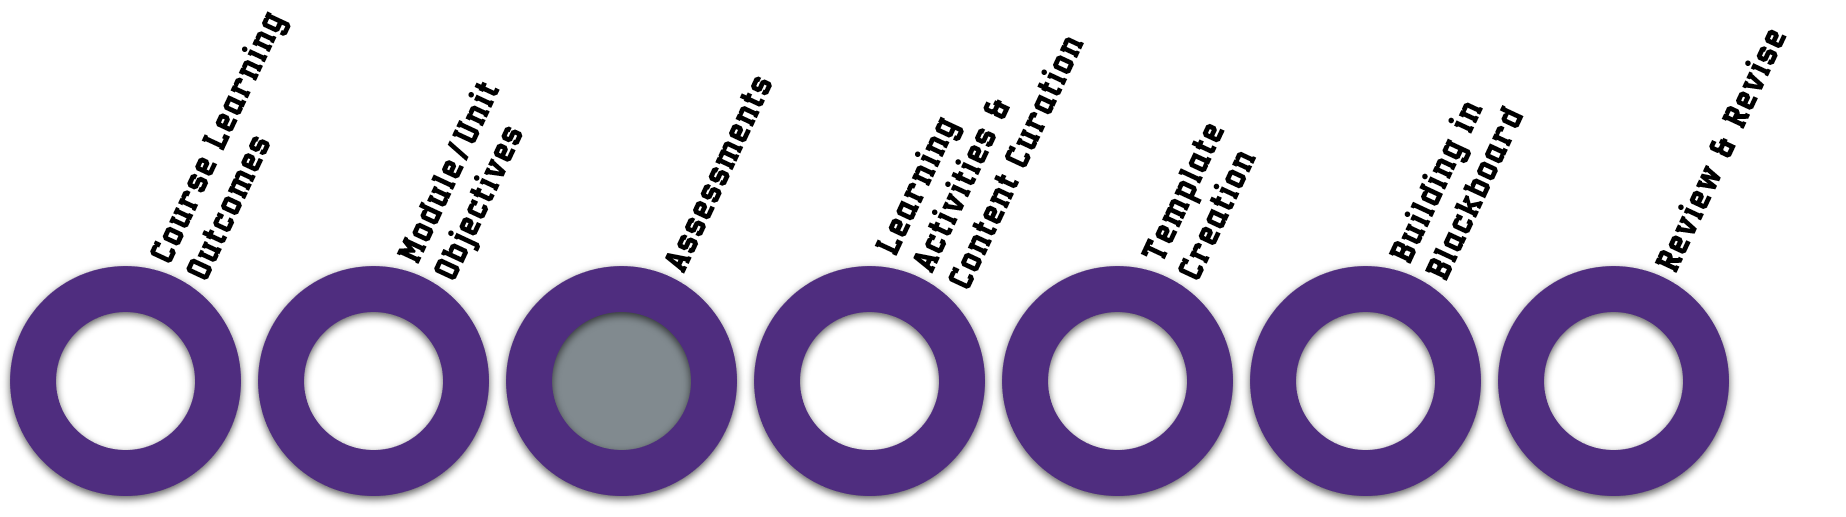

Step 3. What should my students do to show that they have mastered the module objectives?
In this step, you want to determine how you are going to assess your students. Does your learning objective have them “discuss” something? Do they need to write a paper? It’s okay if you don’t have all of the specifics for these assessments at this point. Write down (using the Course Planning Grid) what you think the assessments to meet your module objectives should be. You can always go back and add more detail later.
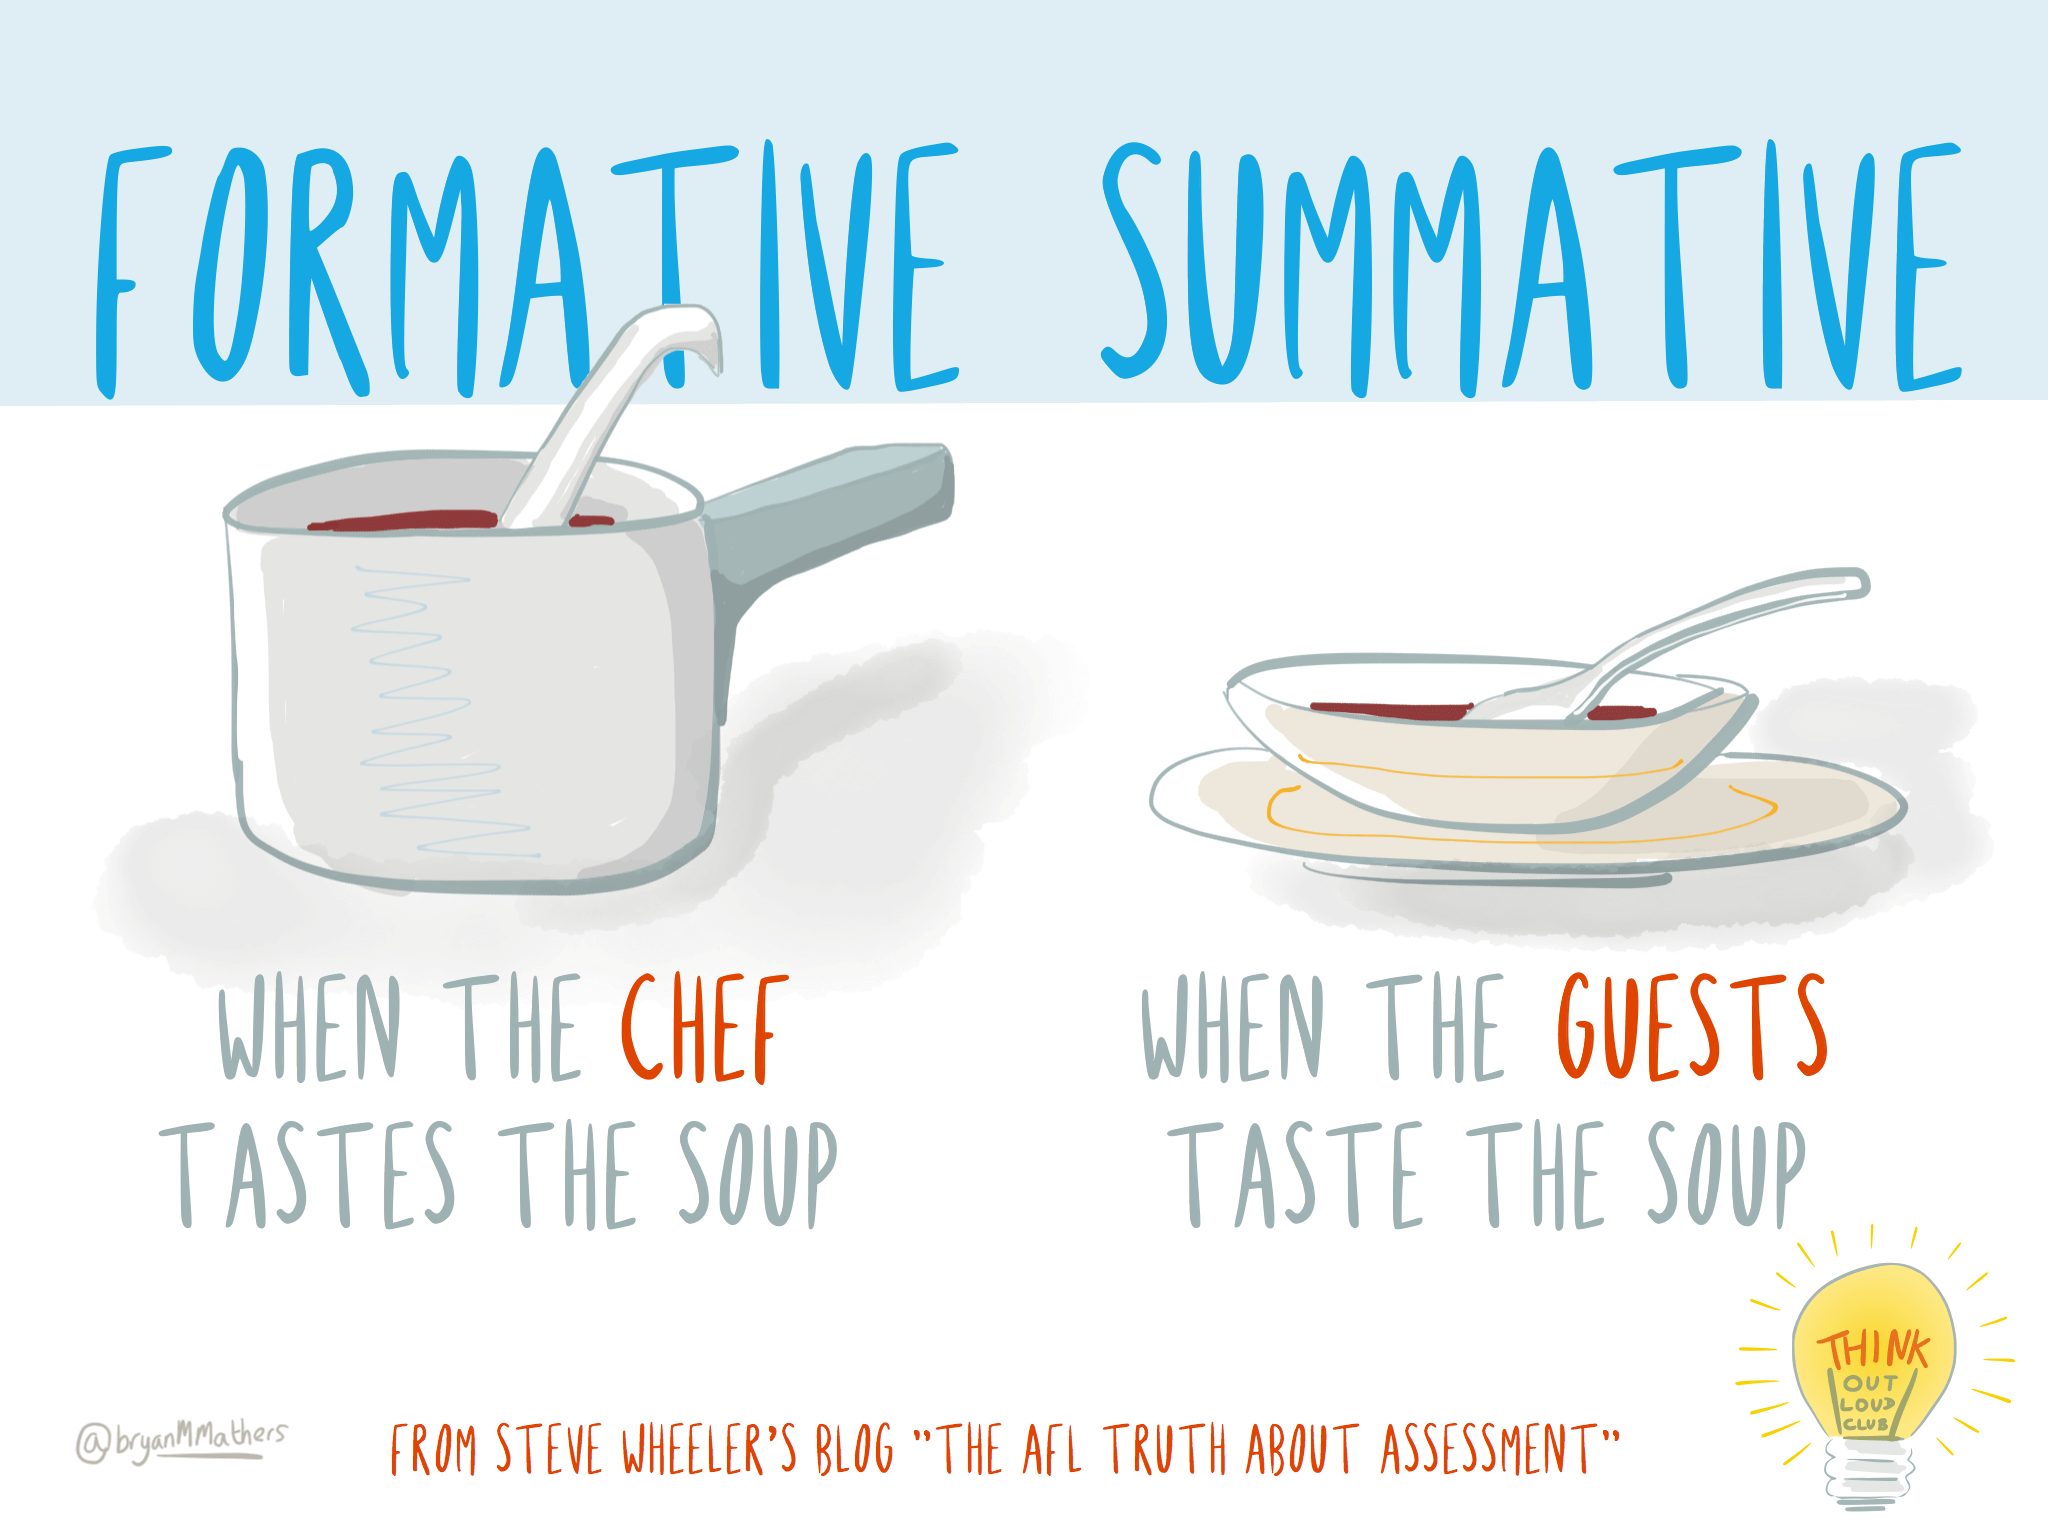
Every objective should have some form of assessment attached to it, otherwise, how are students demonstrating they have met the objective? There are two types of assessments: Formative and Summative. Imagine a ladder. Formative assessments are the rungs that help students reach the top; the top is the summative assessment. This starts to describe scaffolding.
Formative Assessments: Allows students the opportunity to practice their knowledge of the material through low-stakes assignments and quizzes. This allows the instructor the chance to monitor each student’s learning and provide feedback to help them move in the right direction. It also gives the instructor the opportunity to gauge how well their instruction is working with the students. Are certain things still unclear? Are the students grasping the material at the correct pace?
Summative Assessments: Usually take place at the end of the module/unit, that shows the mastery of the objectives from the students (for example, an end-of-unit term paper or exam).
For more information on formative and summative assessments, check out the resources below:
- Formative Vs Summative Assessment: How They Work Together
- Summative and Formative Assessment: Assessing Student Learning


Step 4. What content will my students read/watch/listen/do to engage with my material to prepare them for their assessments?
Now we’re getting into the content portion of the course design process. When creating learning activities, which could be reading a chapter from the textbook, watching a lecture video, or listening to a podcast, you need to make sure that these activities are intentional, meaningful, and useful.
Start writing down what pages of the textbook your students should read. Start bookmarking videos on YouTube your students should watch. Start collecting news articles that might bring real-world relevance to your content to share with your students. Start creating bite-sized (2-4 minute) lecture videos where you explain the concepts and topics of the content using Kaltura. Write these in the Course Planning Grid to show how they align with your assessments.
Key Tip: Unless you’re giving your students additional resources to help their understanding, don’t give content for content’s sake. Only choose content that helps the students complete their assessments. Otherwise, they will skip over it.
For more information on Learning Activities and Content Curation, check out the following resource:


Step 5. How will each of my weeks/modules look to my students, that keeps a logical flow of content and assessments from one to another?
You have made it to the last step of the planning and organizing phase! Congratulations! After this step, the hard work is done, and you’re left with putting all of this into Blackboard. For this step, think about a template that you could follow through every week or module. Yes, each week/module might change slightly (especially with what and how the content is given, what assessments are given, etc.), but you want to think of an order to each week that makes sense and is consistent to allow students to remain focused on the content. Here is an example of a basic template that you could use week-to-week.
Want to use the UCA Online Interface? Follow our instructions for loading the interface into your Blackboard course.
- Weekly Introduction Video from Instructor
- 2-3 minute video that explains this week’s topic, giving a broad overview of the content and why it’s important.
- Icebreaker Discussion Board Posting
- This is a chance to ask a question to get your students talking to one another. Make it a question that relates to the week’s topic, but is asked in a way that students without much knowledge can still answer and contribute. This is a chance to pique the interest of the weekly topic among your students, while also allowing you to see where they’re starting from with this information. You will be able to see how they have grown from this moment to when you see their summative assessment.
- Content
- Textbook readings, lecture videos, podcasts, news articles, etc.
- Formative Assessment
- Low-stakes, short quiz with multiple attempts (auto-graded) to allow students the chance to answer questions about the content to see how they are understanding it thus far. If students are not doing well on these quizzes, it’s a trigger to you to tweak your content or reach out to help.
- Content
- Textbook readings, lecture videos, podcasts, news articles, etc.
- Formative Assessment
- Another low-stakes, short quiz with multiple attempts (auto-graded). For instance, you might assign a class blog or private journal that allows students to reflect on a piece of the material.
- Review
- Instructor video or notes that wraps up the week’s lesson. This is also a chance for the instructor to introduce the summative assignment for the week.
- Summative Assessment
- Written paper, video presentation, recorded podcast, etc., assessment that the student submits that demonstrates they have mastered this week’s learning objectives.
Remember, this is simply an example of what a weekly module might look like in an online course. It can be whatever you want it to be. Just remember to bring in interaction/engagement and a consistent flow that allows students to stay focused on the content.

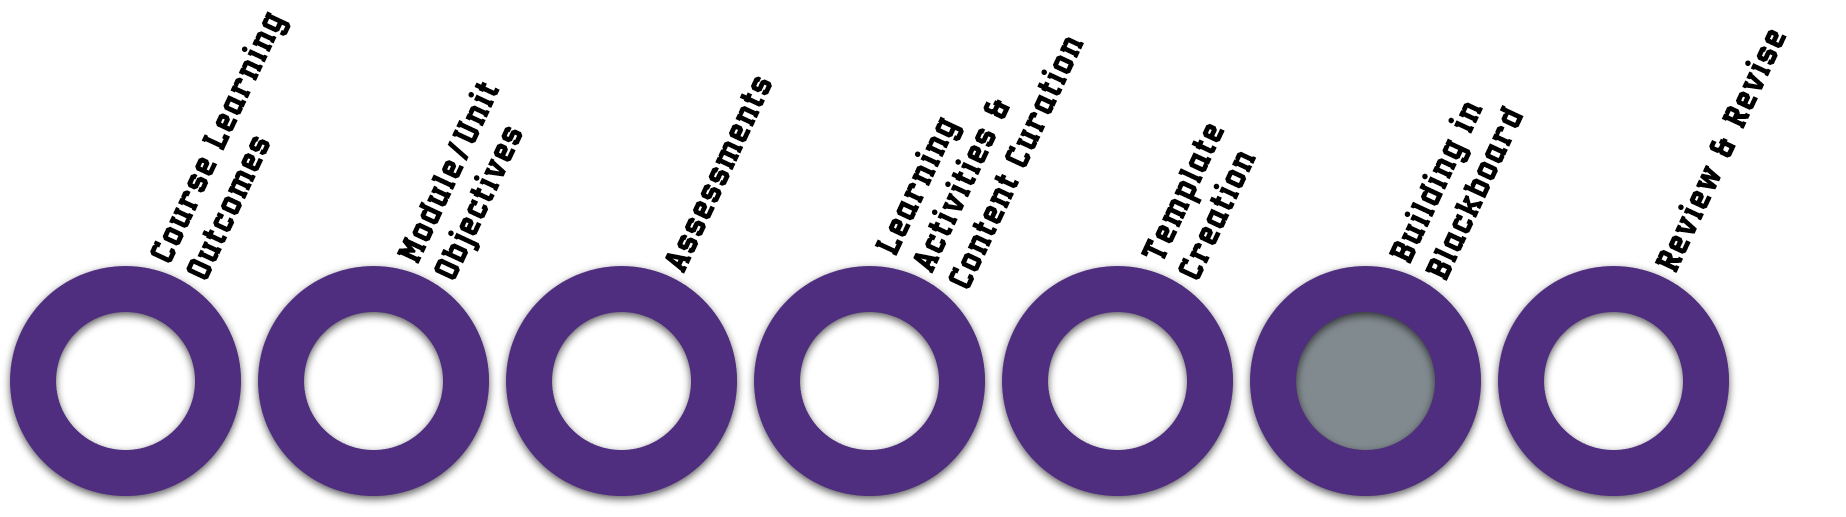

Step 6. How do I put my content into Blackboard?
Now it’s time to start actually putting the paint on the canvas by inserting all of your content inside of Blackboard. Don’t forget to think about Accessibility as you input your content into Blackboard. Refer back to the accessibility section for more information and/or reach out to a CETAL Instructional Designer for more help.
Not all students will have a fast internet connection, so you need to make sure all of your videos can be streamed. DO NOT upload your video files directly to Blackboard. Instead, upload them to Youtube or Kaltura so they can be streamed and captioned. Watch the following video to learn how to do this.
REMINDER: If you upload videos to YouTube, make sure you make them “Unlisted” (instead of Public) to remain FERPA Compliant. Kaltura videos are already FERPA Compliant.
-
- Introduction to Blackboard Playlist (Multiple Videos)
- Create and Organize New Content Folders in Blackboard (Video)
- Creating Announcements (Video)
- Using the Content Editor (Video)
- Creating Assignments (Video)
- Creating Discussion Board Forums (Video)
- Creating Tests/Quizzes Overview(Video)
- Creating and Deploying Tests – More In-Depth (Video)
- Importing Tests into Blackboard Using Respondus 4.0
- Respondus Lockdown Browser for Tests/Quizzes
- Respondus Lockdown Browser: Using External Links and Files
- Respondus Lockdown Browser & Monitor: Instructor Training LIVE Webinars
- How to Find the Grade Center: Use Grade Details to See Attempts and Assign Grades (Video)
- Using the Grade Center (Video)

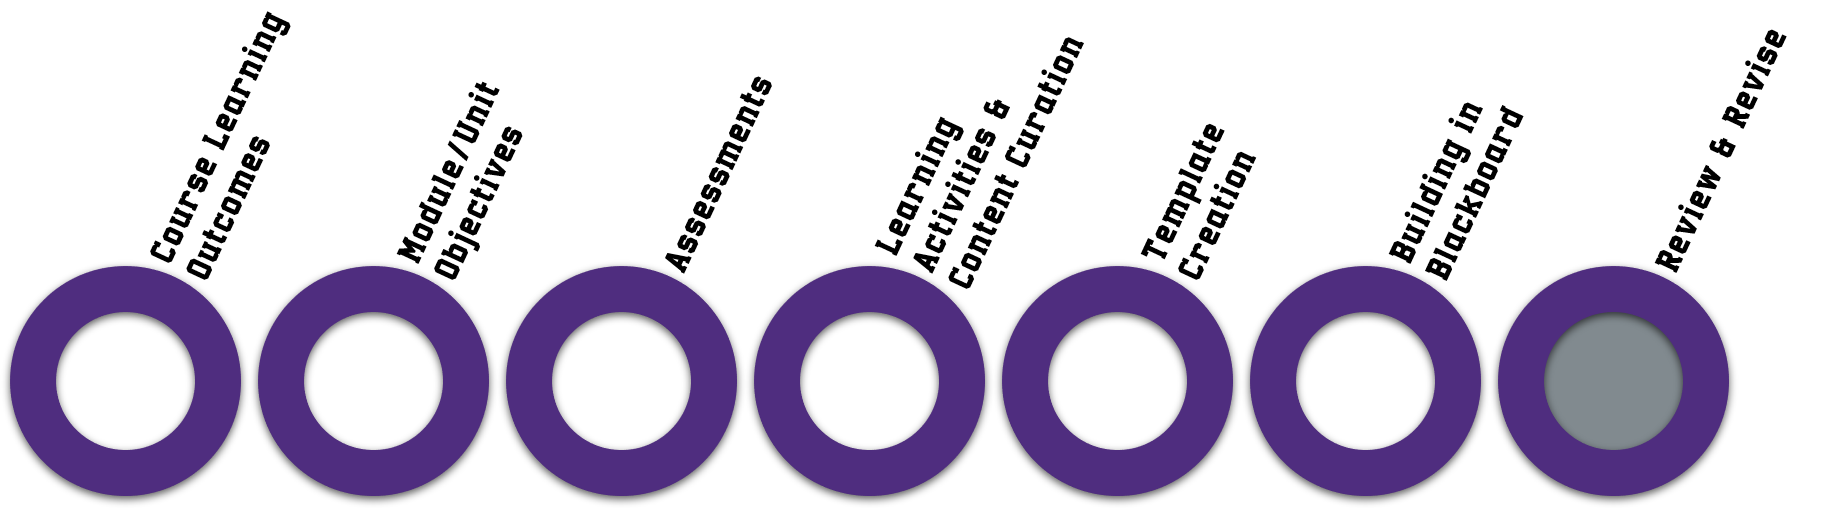

Step 7. How do I make sure my course is ready for students?
After you have completed inputting your content into Blackboard, take some time to go through the course piece-by-piece, looking for misspellings, broken links, and ensuring files all work properly. Have a colleague login to your course and work through it as a student to see if everything makes sense to them. Have them review the course for functionality. The more concerns that can be addressed before students access the course, the better.
Here is a great, simple checklist that you can view to make sure your course has the necessary criteria to be a quality online course.


We have compiled a list of tools that you may want to use in your online course. By being online, you are afforded an abundance of tools that face-to-face courses don’t necessarily have access to. These tools can help present your content in more engaging ways than simply text. There are tools that can create quick, video responses for discussions that you may want to try out. Find tools below that allows your students to quickly make podcasts of their own. If you get overwhelmed and want to brainstorm some ideas on what might work in your course, reach out to a CETAL Instructional Designer. We would be glad to help you determine how you could utilize these tools in exciting and engaging ways in your classroom.
Hosting Class Online with Blackboard Collaborate
Blackboard Collaborate allows you to schedule and hold classes online anytime of the day. If you can’t make it to class in-person, hold class at the same time online. Blackboard Collaborate also allows you to record the entire session, which is great for those students who are unable to join the synchronous session.
- Schedule Sessions in Blackboard Learn
- Blackboard Collaborate with the Ultra Experience (How-To)
- Blackboard Collaborate with the Ultra Experience User Interface Tour (Video)
- How to Access and Download Blackboard Collaborate Recordings
- Blackboard Collaborate Ultra Moderator Guide (PDF)
- Blackboard Collaborate Ultra Experience Help
Creating Lecture Videos with Kaltura
![]()
Kaltura is a service that is integrated into UCA’s Blackboard LMS that allows you to create both videos using your webcam and microphone, as well as screencasts for video lectures. If your class is going to be cancelled, you can use Kaltura to create a video lecture that you send to your students to review before the next in-class meeting. Kaltura also allows the creation of in-video quizzing, where you can embed questions to students to answer while they watch to increase their engagement.
- Kaltura Overview (UCA Resource)
- Personal Capture Walkthrough (Video)
- Record your webcam, audio, and screen
- Download REQUIRED! To download to Windows or Mac Computer:
- Login to Blackboard.
- You will be on the Blackboard Home, aka “My Institution.” Click on “My Media” on the center column.
- On the right side of the screen, click “Add New.”
- Choose “Kaltura Capture”.
- Choose Download for Windows OR Download for MAC and self-install from there.
- Kaltura Express Capture
-
- Record Webcam and Audio. Does NOT record screen.
- No Download Required. Built into Blackboard.
-
- Kaltura Video Quiz
- Embed interactive quizzing as “homework” into videos
- Integrates into Blackboard Grade Center
- Works with created videos and YouTube content
There are some other tools that have free versions that you can look into as well, including Screencast-O-Matic, Jing, and Screencastify.

![]() Since all Summer 2020 courses have moved online, we expect a large increase in support tickets to open with the UCA Help Desk. We suggest you start planning ahead and get familiar with all of these tools now. If you’re having technical issues with Blackboard, your computer, passwords, a software program, or anything technical in nature, you can get support via the following methods:
Since all Summer 2020 courses have moved online, we expect a large increase in support tickets to open with the UCA Help Desk. We suggest you start planning ahead and get familiar with all of these tools now. If you’re having technical issues with Blackboard, your computer, passwords, a software program, or anything technical in nature, you can get support via the following methods:
- UCA Help Desk
- Submit a Ticket
- Knowledge Base
- Email: helpdesk@uca.edu
- Phone: 501-450-3107
- Location: Burdick Hall 101
Are you wanting to get training on how to use Blackboard or an instructional tool, such as Kaltura or Respondus?
The instructional designers in CETAL are also available to help, if possible. Unfortunately, we do not have the resources to build your course for you. Are you wanting to discover ways to be a more effective online teacher? Would you like to know why you should use a blog over a journal in your online classroom? Are your assignments lacking engagement with your students? UCA’s Center for Excellence in Teaching and Academic Leadership has some great instructional designers that can help you!
- Center for Excellence in Teaching and Academic Leadership
- Email: cetal@uca.edu
- Phone: 501-450-5240
- Location: Torreyson West 305