
CourseLeaf CLSS provides a centralized interface for creating and editing course sections, reducing the need to navigate multiple Banner screens. Visualization tools, reports, and analytics help departments review course offerings, coordinate schedules, and make informed scheduling decisions.
Initial Training & Access
New to CLSS? Register for initial training and request the access you need to schedule classes or approve changes for your department.
CLSS Office Hours
Completed your initial scheduler training? Schedule a 30-minute session with a Registrar’s Office staff member to ask follow-up questions.
CLSS Scheduling Phases & DeadlinesReview the scheduling timeline, current phase details, and the fields that can be updated during each phase. |
CLSS Basics
Log In to CLSS
Open CourseLeaf CLSS and log in using your UCA credentials.
Terminology
Instance: The time frame for which courses are scheduled, typically a term or semester, such as Fall 2027 or Spring 2028.
Scheduling Unit: A group of courses scheduled together, usually organized by department or subject code, such as ACCT or BIOL.
Section: A specific offering of a course, including its meeting time, location, and assigned instructor. CLSS is used to edit section information, rather than catalog information.
Scheduling Modes
Design Mode
CLSS serves as the source of scheduling data while you build the schedule.
- Build the entire scheduling unit, then submit it together to the student information system (SIS).
- Only one scheduler can work in a scheduling unit at a time.
Refine Mode
The student information system (SIS) serves as the source of scheduling data.
- Edit and submit changes one section at a time.
- Multiple schedulers can work in the same scheduling unit simultaneously, as long as they are editing different sections.
Scheduling Phases
Phases represent different stages of the scheduling timeline. The current phase determines which changes can be made and which rules apply.
Alerts to Know
CLSS uses different alert types to identify issues and indicate when approval is required.
Error — Cannot Save
An error must be corrected before you can save and proceed.
Warning — Proceed with Caution
You can save, but review the warning and confirm that the information you entered is correct before proceeding.
Workflow — Approval Required
Some changes require approval. Saving submits those changes to the approval process.
Workflow
Workflow is the scheduling approval path. It begins when a scheduler submits the schedule for review and approval.
- Submission and Notification: When the schedule is submitted to workflow, the next person in the approval queue is notified immediately.
- Review and Approval: Approvers may approve the schedule, edit it, or send it back for revisions as it moves through the approval process.
- Transfer to Banner: After final approval, an administrator bridges the schedule into Banner, the student information system (SIS).
Scheduling FAQs
Why isn’t a course showing in my scheduling unit?
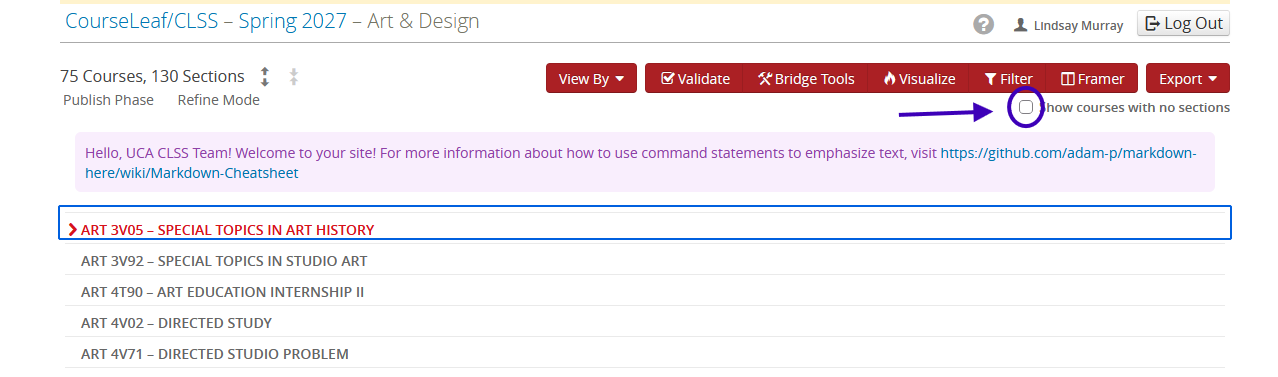
By default, your scheduling unit shows only courses that already have a section scheduled for the selected term. To see all available courses in your unit, select Show courses with no sections beneath the toolbar on the right.
Why can’t I find an instructor?
The instructor dropdown shows instructors assigned to your scheduling unit. If the instructor you need isn’t listed, select Other… and search by name of all instructors at UCA.
If the instructor still doesn’t appear, it’s usually because their hiring process with Human Resources is still underway.
What should I do if I get an error when saving a section?
Look for a red circle with a white dash. The message beside it explains which scheduling rule needs your attention.

What is a Mode? (Design vs. Refine)
Design Mode — submit the entire scheduling unit. When building the schedule for an upcoming term, make all additions, edits, and deletions before validating the schedule. Once the unit is ready, submit it for approval. After final approval, the schedule moves into Banner.
Refine Mode — submit one section at a time. After the scheduling unit completes the approval process, use Refine Mode to make individual changes. For example, if you need to update an instructor for one section, edit and submit just that section. If the change requires approval, CLSS routes it through workflow.
Editing a Section in CLSS
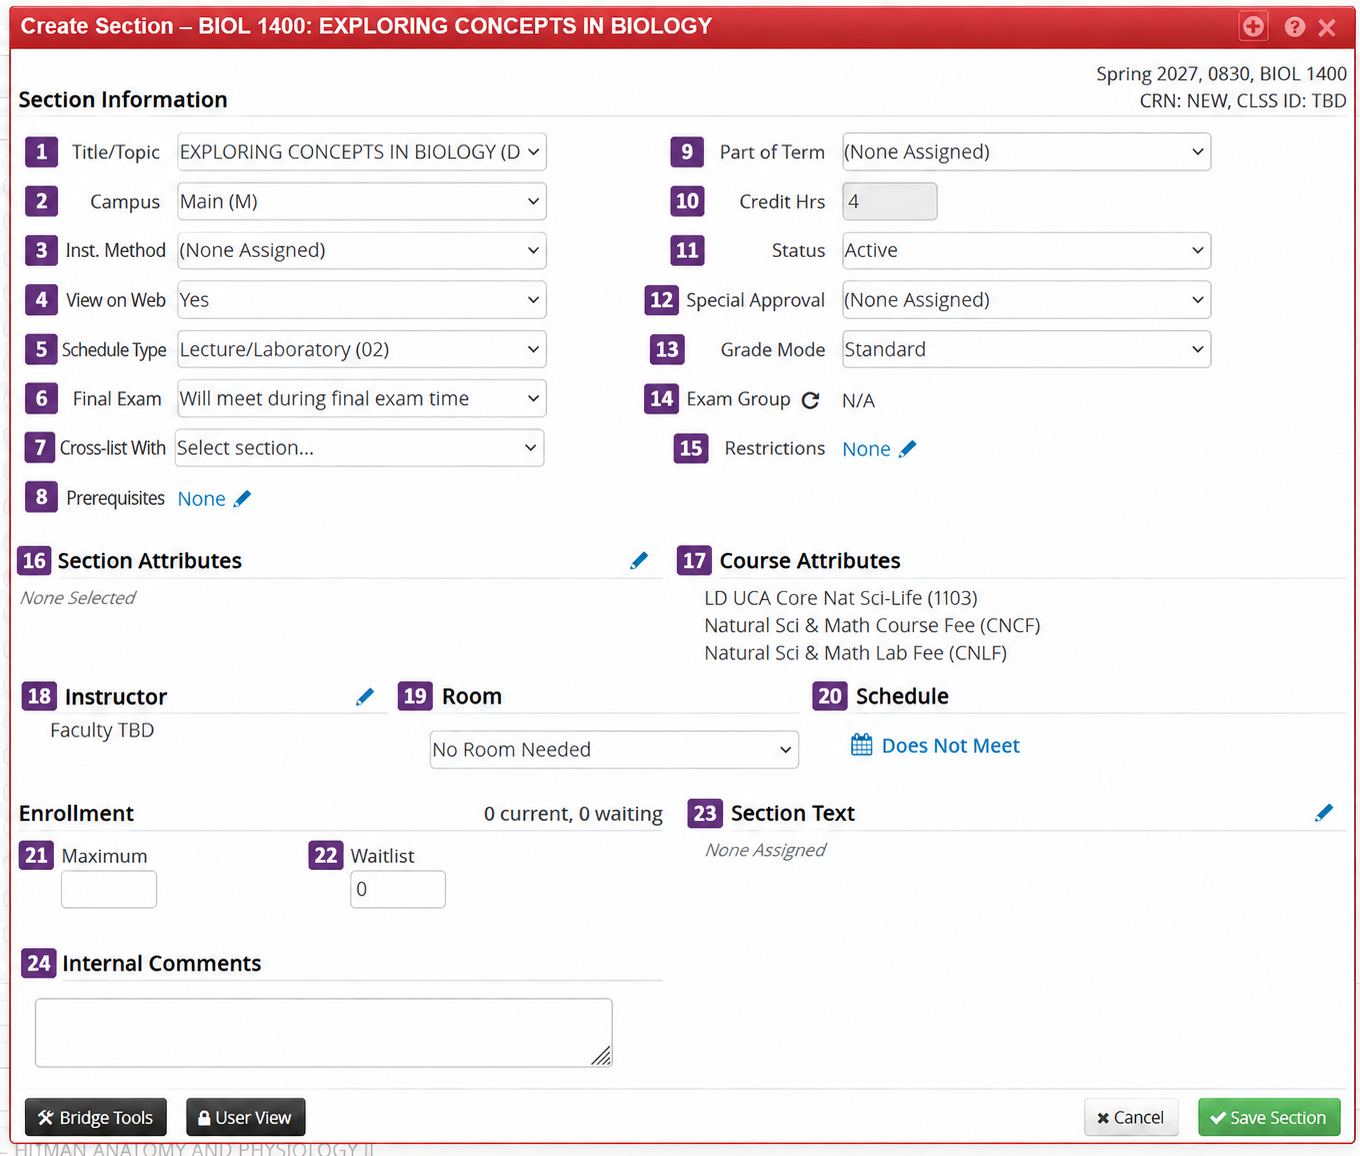
Select the image to view it at full size. Open a field below for instructions.
1. Title/Topic
Transcript Title (up to 60 characters)
This title appears on the student’s transcript. For most sections, use the course title of record. You may add a topic only when the course content is designed to change significantly with each offering, as is typical for special topics courses.
When adding a topic, keep the original title or a recognizable portion of it, followed by a colon and the topic. For example, Special Topics: Amphibian Metaphors in Arkansas Fiction can be shortened to Topics: Amphibian Metaphors.
Registration Title (up to 100 characters)
When entered, this title appears in the online class schedule for that section’s CRN and term.
2. Campus
CLSS defaults to Main (M). Change the campus if the section is a study abroad course or meets at the Innovation Campus (I).
3. Inst. Method (Instructional Method)
Select the instructional method for your section. The dropdown list only shows the methods approved for that course. If the method you plan to use is missing, your department must request approval by submitting the appropriate form on the PandA website.
4. View on Web
CLSS defaults to Yes, so the section appears in the Schedule of Classes. Select No only if you want to hide the section from the Schedule of Classes.
5. Schedule Type
This field defaults to the course’s approved schedule type.
6. Final Exam
- Will meet during final exam time — Select this if the section will meet during its scheduled final exam period.
- Night Class (Begins after 4:30pm) — Select this if the section’s regular class meetings begin after 4:30 p.m.
- Will not meet during final exam time — Select this if the section will not meet during its scheduled final exam period.
7. Cross-list
For CLSS, a cross-listing is two or more sections of one or more courses that meet in the same room, at the same time, with the same instructor.
Every cross-listed relationship includes at least two sections and may include additional sections when needed.
Parent/Controlling Section: Each cross-listed relationship has one parent section. The parent sets the instructor, room, and schedule for all linked sections.
Child/Syncing Section: A cross-listed relationship may have one or more child sections. Child sections inherit the instructor, room, and schedule from the parent. When creating a child section, schedulers can skip fields controlled by the parent.
- Create the parent section first.
- Create the child section.
- In the child section, open the Cross-list dropdown and select the parent section. This links the two sections.
8. Prerequisites
CLSS automatically applies the course prerequisites to each section. This field is view-only.
9. Part of Term
Select the part of term that applies to the section. Its start and end dates are the earliest and latest dates the section may meet. Set the actual meeting days and times in the Schedule field.
10. Credit Hrs
Credit hours default to the value listed in the course catalog. For a fixed-credit course, this field is read-only. For a variable-credit course, CLSS shows the allowed values. Enter the number of credit hours from the given options.
11. Status
Design Mode — You can change a section’s status to Inactive.
Refine Mode — All students must be dropped from the section before it can be inactivated. The Registrar’s Office must approve the status change.
12. Special Approval
Use this field when students need approval to register for the section.
13. Grade Mode
This field defaults to Standard, which is appropriate for most sections. Departments should not select Audit for a section. Students who wish to audit a course must complete the audit request form and follow the audit process.
14. Exam Group
CLSS automatically fills in the exam group based on your selection in the Final Exam field. This field is view-only.
15. Restrictions
CLSS automatically applies course-level restrictions to the section. If you add a section restriction, CLSS routes the change to both the department chair and the Registrar’s Office for approval.
16. Section Attributes
Use this field to add attributes that apply only to the section you’re scheduling. Course-level attributes appear separately under Course Attributes.
17. Course Attributes
This field displays the attributes assigned to the course. It is view-only.
18. Instructor
Select the instructor from the dropdown, which typically lists instructors who can teach in your department. If the instructor is missing from the list, select Other and search by name. If you still can’t find the instructor, you can leave Faculty TBD in place. New hires may not appear in CLSS yet.
19. Room
Select a room from the dropdown list. You can also use the search bar to find a room.
- Select Online for an online course.
- Select No Room Needed if the course does not meet in a room.
- Select Room TBD if a classroom has not yet been determined.
20. Schedule
Use this field to set the meeting days and times for the section.
21. Maximum Enrollment
Enter the maximum number of students who may enroll in the section. You may enter 0. The number must be less than the room’s capacity.
22. Waitlist
To set up a waitlist for the section, enter the number of waitlist spots you want to offer.
23. Section Text
Use this field to add information students will see when they view the section during registration.
24. Internal Comments
Comments stay in CLSS. Use this field to leave yourself a reminder when you plan to return to a section or to explain a change to the next approver. Include any institutional rule or process change that helps the approver understand your request. Keep comments focused on the section and leave out courtesy-only messages such as “Thank you” or a smiley face.