BearCard Mobile

The BearCard Mobile is a digital version of the BearCard. You will use your BearCard Mobile anywhere you would use your physical/plastic BearCard.

– Vending machines (Coke & snack) on campus are not ready to accept the BearCard Mobile. All other readers are ready!

If you add BearCard Mobile and previously had a physical/plastic BearCard, the physical/plastic BearCard will be inactive and will not work on any readers. You can only have one BearCard at a time. The exception to this is Apple users. Apple users can add BearCard Mobile to their iPhone and Apple Watch.


iPhone                                                                 Android


BearCard Mobile Requirements:

• Must be enrolled in at least one class.

• Must have active MyUCA account.

• Must have approved BearCard online photo submittal or have taken a picture in the BearCard office.

• Human Resources will let you know when you are ready for your BearCard.

• Must have active MyUCA account.

• Must have approved BearCard online photo submittal or have taken a picture in the BearCard office.


Apple iPhone
• iOS 12 or later
• iPhone 6 or later, 6S or later for Express Mode
• Apple ID must be signed into iCloud account

Apple Watch
• Apple Watch OS 5 or later
• Apple Watch Series 1 or later
• Apple ID must be signed into the same iCloud account for your iPhone and Apple Watch

Android Smartphone
• Android Version 6.0 or later
• Must have Google Pay set up (or Samsung Pay). GPay required a personal email address. It will not work with your UCA email address.
• NFC chip enabled device capable of supporting Google Pay or Samsung Pay.
• Android Smartwatch – NOT Supported


Instructions on how to provision your BearCard Mobile:

*For international students, faculty and staff who experience issues adding their BearCard Mobile, go to your device Settings – General – Language/Region and change to U.S.

  1. Download the Transact eAccounts Mobile App and Microsoft Authenticator app in Apple App Store. If you already have the apps, update them in the app store. Do not open the Microsoft Authenticator app until you see it in the directions below.
  2. Open eAccounts, swipe through startup screens and tap Get Started.
  3. Refine the search by typing ‘Central’ and select ‘University of Central Arkansas’ and follow the prompts.
  4. Tap “Continue to Sign In” and login with your MyUCA credentials (username without @cub.uca.edu).
    1. MyUCA credentials are on your Admissions accept letter or you can contact the UCA IT HelpDesk. Have the required information ready. The list can be found here under passwords https://uca.edu/it/need-help/help-desk/
  5. Tap “Copy Secret to clipboard” in black letters above “Continue”. It you have your screen settings set to dark, it can be hard to see.
    1. If ‘Set Up Two-Factor Authentication’ button shows instead of “Copy Secret to clipboard”, tap it and it will take you to the Authenticator app and set up a Transact account for you. Tap the code to copy and skip to step 8.
  6. Go to Microsoft Authenticator app. Tap add account or the +. Tap “other (Google, Facebook, etc.)”. Tap “Ok”. Tap “Or enter code manually” when camera comes up.
    1. In “Account name”, type “eAccounts“. In “Secret key”, tap to paste. Tap “Finish”.
  7. Tap on the code under eAccount to copy. 
  8. Go back to the eAccounts app, tap ‘Continue’ and tap to paste the code. Tap “Continue”. You can now view your account balances and meal plans.
  9. Once you have successfully authenticated in eAccounts, tap ‘Add to Wallet’ and follow the prompts.
  10. You now can see your BearCard Mobile displays on the wallet screen.

*For international students, faculty and staff who experience issues adding their BearCard Mobile, go to your device Settings – General – Language/Region and change to U.S.

    1. Download the Transact eAccounts Mobile App and Microsoft Authenticator app in Apple App Store. If you already have the apps, update them in the app store. Do not open the Microsoft Authenticator app until you see it in the directions below. 
    2. Open eAccounts, swipe through startup screens and tap Get Started.
    3. Refine the search by typing ‘Central’ and select ‘University of Central Arkansas’ and follow the prompts.
    4. Tap “Continue to Sign In” and login with your MyUCA credentials (username without @cub.uca.edu).
      1. MyUCA credentials are on your Admissions accept letter or you can contact the UCA IT HelpDesk. Have the required information ready. The list can be found here under passwords https://uca.edu/it/need-help/help-desk/
    5. Tap “Copy Secret to clipboard” in black letters above “Continue”. It you have your screen settings set to dark, it can be hard to see.
      1. If ‘Set Up Two-Factor Authentication’ button shows instead of “Copy Secret to clipboard”, tap it and it will take you to the Authenticator app and set up a Transact account for you. Tap the code to copy and skip to step 8.
    6. Go to Microsoft Authenticator app. Tap add account or the +. Tap “other (Google, Facebook, etc.)”. Tap “Ok”. Tap “Or enter code manually” when camera comes up.
      1. In “Account name”, type “eAccounts“. In “Secret key”, tap to paste. Tap “Finish”.
    7. Tap on the code under eAccount to copy. 
    8. Go back to the eAccounts app, tap ‘Continue’ and tap to paste the code. Tap “Continue”. You can now view your account balances and meal plans.
    9. Once you have successfully authenticated in eAccounts, tap ‘Add to Wallet’ and follow the prompts.
      1. If you have issues with it loading, go to Watch app on iPhone then Wallet & Apple Pay. Enable Apple Cash.
    10. You now can see your BearCard Mobile displays on the wallet screen.
    11. The first time you use your BearCard on your Apple Watch on a reader, you may need to open your Apple Wallet to the BearCard. It may prompt you to double tap the side button.

*If you have Apple Watch, you MUST HAVE IT ON YOUR IPHONE AS WELL so that the BearCard is visible for those that need to view it. The Watch picture is too small.

*For international students, faculty and staff whose country does not support Google Pay, on your phone reset the region to the U.S. by following these instructions https://support.google.com/paymentscenter/answer/9037801?hl=en

  1. Enable NFC on your phone in your Settings menu. NFC settings can be found in different areas of the Settings menu, depending on your device. A common location is Connected Devices – Connection Settings. (If not found there, use the Search option on the top right to double check.) Toggle the NFC setting to On.
  2. Download Google Pay if you do not already have it. Open Google Pay and set it up with your personal gmail address. Your UCA email address will not work at this step. Make sure it is enabled as the default payment. If the app prompts you to add a credit card, you can bypass that screen by returning to the Google Pay home screen or tapping the back button.
  3. Download the Transact eAccounts Mobile App and Microsoft Authenticator app in Google Play. If you already have the apps, update them in the app store. Do not open the Microsoft Authenticator app until you see it in the directions below.
  4. Open eAccounts, swipe through startup screens and tap Get Started.
  5. Refine the search by typing ‘Central’ and select ‘University of Central Arkansas’ and follow the prompts.
  6. Tap “Continue to Sign In” and login with your MyUCA credentials (without @cub.uca.edu). Do NOT used saved passwords or copy/paste.
    1. MyUCA credentials are on your Admissions accept letter or you can contact the UCA IT HelpDesk. Have the required information ready. The list can be found here under passwords https://uca.edu/it/need-help/help-desk/
  7. Tap “Copy Secret to clipboard” in black letters above ‘”Continue”. It you have your screen settings set to dark, it can be hard to see.
    1. If ‘Set Up Two-Factor Authentication’ button shows instead of “Copy Secret to clipboard”, tap it and it will take you to the Authenticator app and set up a Transact account for you. Tap the code to copy and skip to step 8.
  8. Go to Microsoft Authenticator app. Tap add account or the +. Tap “other (Google, Facebook, etc.)”. Tap “Ok”. Tap “Or enter code manually” when camera comes up.
    1. In “Account name”, type “eAccounts“. In “Secret key”, tap to paste. Tap “Finish”.
  9. Tap on the code under eAccount to copy. 
  10. Go back to the eAccounts app, tap ‘Continue’ and tap to paste the code. Tap “Continue”. You can now view your account balances and meal plans.
  11. Once you have successfully authenticated in eAccounts, tap ‘Add to GPay’ and follow the prompts.
  12. You now can see your BearCard Mobile displays on the GooglePay app.

If you had your BearCard Mobile previously on an iPhone or Apple Watch and get a new device, you will need to remove your card from the old device before setting up a new device. Please follow these steps for removing a card:

• Email the BearCard office with your ID number and let them know you need your MFA reset.

• On your new iPhone, navigate to Settings and then tap the very top selection (the section with your name) to go into your iCloud Settings.

• Scroll down to see your devices associated with your iCloud account and select your old iPhone.

• Scroll down to see the Apple Pay section and you should see “UCA”. Tap “Remove All Cards.” This will remove all your cards on your Wallet including your BearCard Mobile.

• Go to your Apple Wallet on your new iPhone to make sure the UCA card was removed. If not, tap three buttons in right top corner of card. Go to the bottom and select ‘Remove This Card’.

• Once the card is removed from your old iPhone, you can log into the eAccounts Mobile App on your new iPhone and follow the steps to add the card on your new iPhone.

• If you have a new Apple Watch, you can follow the same steps to remove the card from the old Watch.

• If you have trouble with this, please contact the BearCard office to retire your old BearCard Mobile at 501-450-5818 or bearcard@uca.edu. It is also possible that your eAccounts will need to be reset.

If you had your BearCard Mobile previously on an Android Phone and get a new device, you will need to remove your card from the old device before setting up a new device. Please follow these steps for removing a card:

• Email the BearCard office with your ID number and let them know you need your MFA reset.

• Open Google Pay

• Select “UCA

• Touch the three dots in the upper right corner of the screen

• Select Remove ID

Confirm to remove ID

• If you have trouble with this, please contact the BearCard office to retire your old BearCard Mobile at 501-450-5818 or bearcard@uca.edu. It is also possible that your eAccounts will need to be reset.


Notes for use:

iPhones: The chips are by the camera at the top back.

Apple Watches: The chips are located on the face of the watch.

Android Phones: The chips are often in the middle back, but vary depending on type of phone. The location could be only the top, only the middle, only the bottom or the whole back. See the squares below. As a result, you may have to adjust the orientation of your phone by the reader to have your BearCard Mobile recognized.

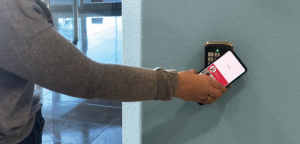
iPhones: Keep the device facing you and put the chip by the reader. For retail, the cashier will prompt you after they ask what form of payment.
– If you have ‘Express Mode’ on your phone (iPhone 6S and later) and it is enabled, you do not have to open the Wallet or GPay to use the BearCard Mobile. Simply place your locked device by the reader and it will bring your BearCard Mobile up with a green check mark and a sound.
– For iPhone 6/6 Plus, double-click the Home button, select your default payment card, and select your BearCard Mobile. Verify your identity with Touch ID or passcode, then with the screen facing you place the top of your phone by the reader.
– Your device must be powered on, but it does not have to be connected to Wi-Fi network.
– Some devices (iPhone X models and later) will still work for a period of time after your battery has been depleted.

Apple Watch: Put the face of the Watch by the reader. Be careful not to tap the face of your Watch to prevent damage. For retail, the cashier will prompt you after they ask what form of payment.

Android Phones: You do not need to unlock your phone, but the screen must be awake to use your BearCard Mobile. Push the power button to wake the screen. Keep the device facing you and put the chip by the reader. For retail, the cashier will prompt you after they ask what form of payment.
  • Apple: Open Apple Wallet and select your BearCard Mobile from your saved cards. The three dots in right top corner will take you to the back of the card, which is where you can view your ID number.

  • Android: Open Google Pay, tap the credit card icon in the top right corner, tap back button, then select your BearCard Mobile and tap the BearCard again. The three dots in right top corner then view details will take you to the back of the card, which is where you can view your ID number. Be careful to not tap ‘Remove ID’.

*The eAccounts app is separate from the Wallet and GPay. It must remain on your phone. The eAccount app is where you make BearBucks deposits and check your account balances. You can toggle between the two apps with Apple but not Android.

You will see your BearCard Mobile with a blue check mark come up and a sound when it has been read by a reader. This does NOT mean the transaction was approved. It means the reader picked-up your BearCard Mobile signal. The cashier will let you know if it was approved like normal with a physical/plastic card. For doors, there will be a green light and beep on the reader if the access was granted and the door will unlock.

iPhone                                                      Android